 |
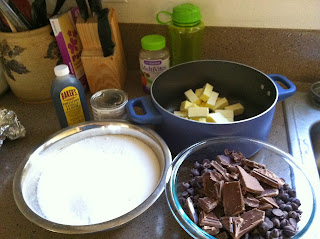
| Everything together! |
The recipe is fairly simple, it just takes a good eye and patience. You have to make sure everything melts and doesn't burn - the good eye at work - and you have to let is sit long enough to firm up - lots and lots of patience. It wasn't uncommon in our house for fingerprints to show up in the final product, even after we burned our mouths on the pot scrapings.
If you have younger kids helping you (or under foot in general), put them to work. Breaking the chocolate bar was alway a fun job. Just leave it wrapped, but it in a gallon ziplock to be sure, and let them smash it all over the place. Greasing the pans is good but messy too.
Please, please, please be careful when boiling the sugar mixture. It is molten sugar and therefore very hot. I've had many a sugar burn and even the smallest splash hurts.
And now, the good part. The fudge. You can add things if you want like nuts or dried fruit (I've never done it with fruit, but I'm sure it would still be tasty), but I like it plain and simple. You can mix the chocolate as you see fit. Mine is usually a mix of either semi-sweet and/or dark chocolate chips and a milk chocolate bar. This particular batch uses one bag semi-sweet, one bag dark, and a king size hershey's bar. If you can't find a big jar of marshmallow creme, two small ones work just as well; the large jars we used originally were 14 ounces, now they are 13 ounces.
This single recipe makes a lot of fudge. It makes 2 9-in x 13-in or 1 11-in x 17-in pans. You may look at it when you're done and think it's not really that much, but it is rich. I had some my mom sent me back in college about the size of a VHS case; it lasted me from when I got it, just before Winter Hols, all the way to spring finals in May.
 |
| All measured and opened - except for the marshmallow. |
~*~*~*~*~*~*~*~*~*~*~*~*~*~*~
Fudge
3 sticks of butter, cubed + extra for greasing
6 cups of sugar
1 can of evaporated milk (NOT condensed)
1 large chocolate bar, broken
2 bags of chocolate chips of your choice (see note above)
1 13-oz jar or 2 7-oz jars of marshmallow creme
1 tspn vanilla
Line 2 9-in x 13-in pans or 1 11-in x 17-in pan with foil and grease well. Like ridiculously well.
In a large pot combine the butter, sugar, and evaporated milk over medium-ish heat. Once it begins to boil, boil it for 5 minutes, stirring constantly. Do circles, do swirls, do figure eights. You don't want to burn this. Burned sugar is not pretty and does not taste good. A second pair of hands can come in handy, but it can be done alone.
Taking a picture while stirring on an uneven burner is not recommended.
After the 5 minutes remove it from the heat and immediately add the chocolate. Stir until everything is nice and smooth. Then add in the creme. This is the place it is easiest to have two people. One to scrape and one to stir. Stir it well and then add the vanilla. Once everything is nice and smooth, you're good.
Pour as evenly as possible into your pan(s). Be patient and allow it to sit and firm up. Feel free to eat the bits still in the pan though. It will take a few hours. Once it is firm, though, you can take it out of the pan, wrap it up, and stick it in the freezer. Once solid, you can split it up, wrap it, hand it out as gifts or keep it all to yourself.
 |
| Spoon for licking when cooler... maybe... |
 |
| Only downside to a non-stick pan, not as much to scrap clean. |
All told, this probably takes 10 minutes to actually make. The longest part is waiting for it to cool. When it does though, oh man. Enjoy your fudge!


No comments:
Post a Comment