Monday, November 25, 2013

Mom's Fudge

One of my favorite things about the holiday season growing up was making the treats. Eating them too, yes, but working with my mom and my brother to make fudge, cookies, and caramel corn. This year will be the first time in about two years, I've really made any of those. I don't know if I'll get to the popcorn, but the fudge and cookies are both on my list. Today is all about the fudge.

Everything together!
Thick, rich chocolatey goodness. We always cut it into about 1-inch squares, but really a smaller piece would usually suffice. Mom took her recipe from the Jet-Puffed marshmallow creme jars (back when they were still glass) and we tweaked it. It was always a sticky mess - getting marshmallow out of a jar is hard - but the family tradition was worth it.

The recipe is fairly simple, it just takes a good eye and patience. You have to make sure everything melts and doesn't burn - the good eye at work - and you have to let is sit long enough to firm up - lots and lots of patience. It wasn't uncommon in our house for fingerprints to show up in the final product, even after we burned our mouths on the pot scrapings.

If you have younger kids helping you (or under foot in general), put them to work. Breaking the chocolate bar was alway a fun job. Just leave it wrapped, but it in a gallon ziplock to be sure, and let them smash it all over the place. Greasing the pans is good but messy too.

Please, please, please be careful when boiling the sugar mixture. It is molten sugar and therefore very hot. I've had many a sugar burn and even the smallest splash hurts.

And now, the good part. The fudge. You can add things if you want like nuts or dried fruit (I've never done it with fruit, but I'm sure it would still be tasty), but I like it plain and simple. You can mix the chocolate as you see fit. Mine is usually a mix of either semi-sweet and/or dark chocolate chips and a milk chocolate bar. This particular batch uses one bag semi-sweet, one bag dark, and a king size hershey's bar. If you can't find a big jar of marshmallow creme, two small ones work just as well; the large jars we used originally were 14 ounces, now they are 13 ounces.

This single recipe makes a lot of fudge. It makes 2 9-in x 13-in or 1 11-in x 17-in pans. You may look at it when you're done and think it's not really that much, but it is rich. I had some my mom sent me back in college about the size of a VHS case; it lasted me from when I got it, just before Winter Hols, all the way to spring finals in May.
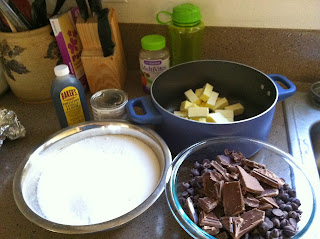
All measured and opened - except for the marshmallow.
Measure everything out /open everything before you start. It makes it a lot easier in the long run. Submerging the creme in a large container of hot water makes it come out easier. A heavy duty wooden spoon is needed too. I have broken many a spoon doing this. Even though I'm using disposable pans, I still line them with foil and grease them super well. It makes transferring to the freezer easier later.

~*~*~*~*~*~*~*~*~*~*~*~*~*~*~
Fudge

3 sticks of butter, cubed + extra for greasing
6 cups of sugar
1 can of evaporated milk (NOT condensed)
1 large chocolate bar, broken
2 bags of chocolate chips of your choice (see note above)
1 13-oz jar or 2 7-oz jars of marshmallow creme
1 tspn vanilla

Line 2 9-in x 13-in pans or 1 11-in x 17-in pan with foil and grease well. Like ridiculously well.


In a large pot combine the butter, sugar, and evaporated milk over medium-ish heat. Once it begins to boil, boil it for 5 minutes, stirring constantly. Do circles, do swirls, do figure eights. You don't want to burn this. Burned sugar is not pretty and does not taste good. A second pair of hands can come in handy, but it can be done alone.

Taking a picture while stirring on an uneven burner is not recommended.

After the 5 minutes remove it from the heat and immediately add the chocolate. Stir until everything is nice and smooth. Then add in the creme. This is the place it is easiest to have two people. One to scrape and one to stir. Stir it well and then add the vanilla. Once everything is nice and smooth, you're good.


Pour as evenly as possible into your pan(s). Be patient and allow it to sit and firm up. Feel free to eat the bits still in the pan though. It will take a few hours. Once it is firm, though, you can take it out of the pan, wrap it up, and stick it in the freezer. Once solid, you can split it up, wrap it, hand it out as gifts or keep it all to yourself.

Spoon for licking when cooler... maybe...


Only downside to a non-stick pan, not as much to scrap clean.
All told, this probably takes 10 minutes to actually make. The longest part is waiting for it to cool. When it does though, oh man. Enjoy your fudge!

Tuesday, June 4, 2013

Vegan Chocolate Cupcakes

I like challenges with baking and work provides me with two. One of my friends (the same who got the hemlock wedding blanket) has a gluten intolerance and several people are vegetarian/vegan. I've already ventured into the gf world with Moscato cupcakes. Now for the vegan (the Elsa mentioned in the Moscato post as well as her boyfriend, Gregg). To be honest, I like these better. Possibly because they're chocolate... Needless to say, the first time I made these they were devoured; this time, though, Nathaniel is not allowed more than one, maybe two if one goes home.

I made three dozen of these babies. For once it's not a "just because". Soona, an awesome lady I've come to love working with (after being terrified of her for nearly six months), is leaving to attend Washington State and get her MAT. While I'm very excited for her in this new opportunity, she will be greatly missed. We are throwing her a (second) potluck party and I'm bringing drinks and cupcakes. Chocolate and sweet - they appeal to two of her likes.

These were pretty easy and for not having eggs/buttermilk/whatever, they rose really well and were moist. I did the frosting two different ways. The first time I used Ghirardelli 72% Twilight Delight chocolate. It made a very intensely dark ganache. The second time I used Scharffen Berger Semisweet Dark Chocolate. I found it at Grocery Outlet of all places and it worked really well for these cupcakes.

~*~*~*~*~*~*~*~*~*~*~*~*~*~*~

Vegan Chocolate Cupcakes

1½ cups all-purpose flour
¾ cup granulated sugar
3 tablespoons cocoa powder
2 teaspoons espresso powder
1 teaspoon baking soda
½ teaspoon salt
1 teaspoon vanilla extract
1 teaspoon vinegar
¼ cup vegetable oil
1 cup water

Preheat oven to 350 degrees F (180 degrees C). Line a cupcake pan with baking cups.

In a mixing bowl, whisk together the flour, sugar, cocoa, espresso powder, baking soda, and salt. Add the vanilla extract, vinegar, oil, and water. Mix the batter until smooth.

Divide batter evenly between 12 baking cups (about ¾ full). Bake for 18-22 minutes, or until a toothpick inserted into the center comes out clean. Remove from baking pan and allow to cool to room temperature.

That odd ball on the side...I ate it. And then made another dozen.

~*~*~*~*~*~*~*~*~*~*~*~*~*~*~

Coconut Milk Ganache

6 ounces semi-sweet chocolate, finely chopped (use dairy-free to keep vegan)
½ cup coconut milk

Place chopped chocolate into a mixing bowl. Set aside.

On medium-high heat, bring coconut milk to a boil, stirring occasionally to prevent the milk from scorching.

Pour milk over the chocolate, making sure that the milk covers the chocolate. Allow to sit for several minutes before stirring until smooth. Allow frosting to rest on the counter until it cools down and thickens to a pipe-able consistency (anywhere from 20 to 40 minutes).

Beat the frosting for several minutes until it incorporates air and feels lighter.

Place frosting in a pastry bag (or plastic bag with the corner cut out) and pipe frosting onto the cooled cupcakes.


This wasn't the one I was going to use originally, but I found it at Grocery Outlet.
It's sweeter than the first I used and still vegan.

Mmmm Smooth chocolate ganache ready to chill before whipping and piping.
My final obstacle of the day was figuring out how on earth I was going to transport 3 dozen cupcakes to work on the bus. Google came to the rescue! You know those little 9 oz clear plastic cups? Those are perfectly cupcake sized.


Frosted and chilling in the fridge to set before packing.
Simply piped ganache and a dark chocolate coffee bean.
The cup protects the frosting from squishage.
Edited 6/6/2013: These were a hit at the party. Everyone loved them (especially Elsa, Soona, and Nathaniel). I got compliments the rest of the afternoon and today as well. Several couldn't believe they were vegan.

It was a very emotional afternoon too. Soona was presented with a big frame with five of her favorite monkeys and signed by lots of people. It was the first time I, and many others, had ever seen her cry. When it came time to turn in her badge and keys at the end of the day, Phil had to drive her around beforehand so she could stop crying again. I'm going to miss that lady. We all will. She is off to wonderful adventures in the world of high school science and she will have lots of amazing stories to tell her future students.

Single Serve Shepherd's Pie

Again with my cravings. I wanted shepherd's pie but all the recipes I found were for big servings. It's only little ole me in the apartment (until the 15th anyway, but that's another story). I found one for a single serving but it didn't have everything I wanted in it, so I adapted. I was also lazy and used instant potatoes. Not as many pictures as usual because I forgot until it was already in the oven.

~*~*~*~*~*~*~*~*~*~*~*~*~*~*~

Shepherd's Pie for One
~Adapted from Gourmet Recipes for One

2 servings prepared instant mashed potatoes.
2 tablespoons extra virgin olive oil, divided
1/4 pound ground beef
1 medium carrot, diced
1/4 medium onion, diced
1 tablespoon flour
2 tablespoons ketchup (you can use tomato paste, but this is what I had on hand)
1 teaspoon Worcestershire sauce
1/4-1/2 cup beef or vegetable stock
1/4 cup frozen peas
1/4 cup frozen corn
Preheat oven to 400°F. Place a 16-ounce oven-proof dish on an aluminum foil-lined baking sheet and set aside.

In sauté pan, heat 1 tablespoon olive oil over medium heat. Add beef, breaking up into smaller pieces, and cook until beef is browned. Season with salt and pepper. When beef is cooked through, remove with a slotted spoon and transfer to a bowl. Drain off excess grease from pan and wipe clean.
Heat remaining 1 tablespoon olive oil over medium heat. Add carrot and cook for 7-10 minutes, until just softened. Add onion and cook for another 7 minutes or until tender. Return meat to pan and add flour, stirring to coat. Let cook for about 2 minutes.
Add ketchup, Worcestershire sauce and stock and season with salt and pepper. Scrape up any brown bits on bottom of pan. Bring mixture to a boil, then reduce to low and allow to simmer until mixture starts to thicken. Stir in peas and corn and transfer mixture to dish. Top with mashed potatoes. Smooth out top of potatoes with back of a spoon and bake for 20-25 minutes, until top of potatoes is lightly golden brown.

Finishing pictures! Like I said, I forgot until it was already in the oven.

Fresh out of the oven. Glad I lined the pan.
It made a bit of a mess...

Almost perfect way to end the night. Pie and Castle.
Perfect would have added a glass of wine.

Tuesday, March 19, 2013

Crustless Quiche

I got this sudden, urgent craving for quiche today. Who am I to deny what I haven't had for a while and is cheap and easy to make? I made crustless spinch and mushroom quiche. Warning - it's really cheesy.

~*~*~*~*~*~*~*~*~*~*~*~*~*~*~

Ingredients:
8 oz. fresh mushrooms
1/2 tsp minced garlic
Butter
6 oz (small-ish bag) fresh spinach, chopped or torn into pieces
4 large eggs
1 cup milk
2 oz. feta cheese
1/4 cup grated parmesan
1/2 cup shredded mozzarella
salt & pepper

Preheat your oven to 350 degrees.

Quickly rinse the mushrooms and slice them thinly. Place the sliced mushrooms in a skillet a bit of butter, add the minced garlic, and sprinkle a little salt and pepper (I also added some Italian seasoning for good measure, but that's totally optional). Turn the heat on to medium-high and saute the mushrooms until they release all of their moisture and no more water remains on the bottom of the skillet (5-7 minutes). When they are almost done, add the spinach and saute until just wilted and darker green.


Spray a pie dish with non-stick spray. Add the mushroom/spinach mixture and the crumbled feta.


In a medium bowl whisk together the eggs until fairly smooth. Add the milk, parmesan, and another sprinkle of pepper. Whisk to combine. (This step can be completed while the mushrooms are cooking) Pour this mixture into the pie dish over the spinach, mushrooms, and feta. Sprinkle the shredded mozzarella cheese over top.


Place the pie dish on a baking sheet for easy transfer into the oven. Place the quiche into the preheated oven and bake until it is golden brown on top and the center is solid. Every oven is different but this should take between 45 minutes and an hour. Slice and serve!


Wednesday, February 20, 2013

Moscato Cupcakes


Never fear! The food porn has returned! This go around I have two versions of Moscato Cupcakes adapted from the Sutter Home Wine Blog. The first version is the original and the second is a gluten-free version. The change for the gf one (there really is only one change) is in parenthesis. I also used a classic buttercream in place of the moscato vanilla as one of my dear friends at work is pregnant.

I was given a $30 gift card to Joann's for Christmas; I assume it was meant to buy knitting supplies with. All my knitting supplies I buy from Tina though. In baking these cupcakes, I was struck by the need to make them pretty. I caught the bus and promptly spent the entire cad (and then some) on decorating supplies. Please bear with my decorating skills. I haven't done it in a while and that wasn't fancy either. Because of that, this is an image heavy post.

~*~*~*~*~*~*~*~*~*~*~*~*~*~*~
Cupcakes:
2 and 1/2 cups all-purpose flour (for gluten-free use 2 1/2 cups gf ap flour and 1 1/4 teaspoons xanthan gum)
1 tsp. baking soda
3/4 tsp. salt
1 and 1/4 cups white sugar
1 cup canola or vegetable oil
1/3 cup Moscato wine
3/4 cup buttermilk
2 large eggs
1 tsp. white vinegar
Optional: fresh strawberries or sprinkles for garnish

Preheat oven to 350 degrees F. Put cupcake liners in two cupcake pans. This recipe should make 12-24 cupcakes depending on the size of your pan. (I was able to get 24 of each.)

In a large bowl, combine the flour, baking soda, salt, and sugar, and whisk together. In a separate bowl, combine the oil, Moscato, buttermilk, eggs, and vinegar. Slowly pour the wet ingredients into dry and mix until it is just blended.

Scoop the batter into the prepared cupcake pan, filling each about 3/4 full. Bake for 15-17 minutes or until a toothpick inserted into the middle of a cupcake comes out cleann (It took 24 minutes for both the regular and the gf versions). Cool completely on wire racks before frosting.

~*~*~*~*~*~*~

Buttercream Frosting:
1 cup unsalted butter (2 sticks or 1/2 pound), softened (but not melted!) Ideal texture should be like ice cream.
3-4 cups confectioners (powdered) sugar, SIFTED
1/4 teaspoon table salt
1 tablespoon vanilla extract
up to 4 tablespoons milk or heavy cream

Beat butter for a few minutes with a mixer with the paddle attachment on medium speed. Gradually add 3 cups of powdered sugar and using the lowest speed on your mixer so the sugar doesn’t blow everywhere. Work it in until the sugar has been incorporated with the butter. Increase mixer speed to medium and add vanilla extract, salt, and 2 tablespoons of milk/cream and beat for 3 minutes. If your frosting needs a more stiff consistency, add remaining sugar. If your frosting needs to be thinned out, add remaining milk 1 tablespoons at a time.

~*~*~*~*~*~*~*~*~*~*~*~*~*~*~

In my opinion the gf ones turned out prettier than the regular ones. Before frosting them, I tried one of each and found I preferred the gluten-free ones, strangely enough.


Baked but undecorated! Gluten-free (L) and Regular (R)

Since my cupcakes were in gold and silver, I was going to frost them in red and green respectively to appease my Harry Potter nerd. Unfortunately neither the red nor green wouldn't go dark enough, so I have leafy green and bright pink.


The second batch of frosting I did in pastel colors - blue, purple, and orange. The orange reminds me of sherbert. Yummmmm. I liked the starburst flower thing so I did it a few times. And yes, those are two poor, unfrosted cupcakes that I didn't have enough for. They will be delicious anyway.


That's all my food porn for today. Now that I've found something to satisfy Tracie's gluten-free sweet tooth, I'm on to Elsa, my dear vegan friend.

Monday, February 18, 2013

So it's been a while...

I know it's been a while since I posted. Things have been happening. I'm behind (Really super duper behind) on the 30 days of knitting. I haven't posted any food porn in a while - this will be fixed. I'm making moscato cupcakes tomorrow. So things happening with me since December.

Not much actually. I'm getting a new computer which should arrive on Monday the 25th. I'm super excited about that. I've worked every holiday since I started working (Thanksgiving, Christmas, New Years, MLK, and President's Day). Oh! In mid-December-ish I transitioned from a temporary LAT-1 to a full-time LAT-1. The biggest change from temp to full is that I now get benefits! That makes me super happy.

You know what else makes me super happy? LeakyCon 2013. It is in Portland this year. I requested all 4 days off and was granted them. I will be attending LeakyCon with a LitTrack pass. Four days of uninterrupted Harry Potter nerdiness followed by two days of recovery before I have to return to work. I am so fricking excited.

I think I should stop before I get myself too worked up.